Gluten-free Hawaiian Sweet Rolls
You guys. I made gluten-free Hawaiian sweet rolls.
And they were amazing (totally scary for me as it was my first foray into gluten-free bread but I was blown away by how well they turned out) and pretty darn lovely looking, too.
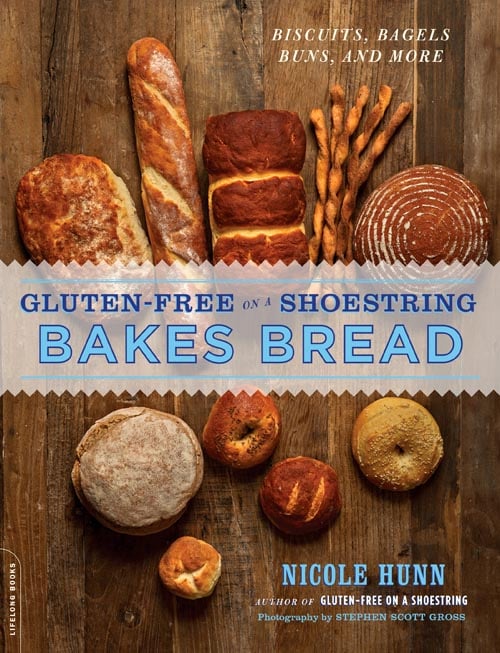
My friend, Nicole, of Gluten Free on a Shoestring fame is coming out with her 3rd gluten-free cookbook and it is entirely dedicated to gluten-free breads.
Which is kinda sorta amazing because when I think “eating gluten-free” I think “how the heck do I get my carb fix?”
Nicole has you covered.
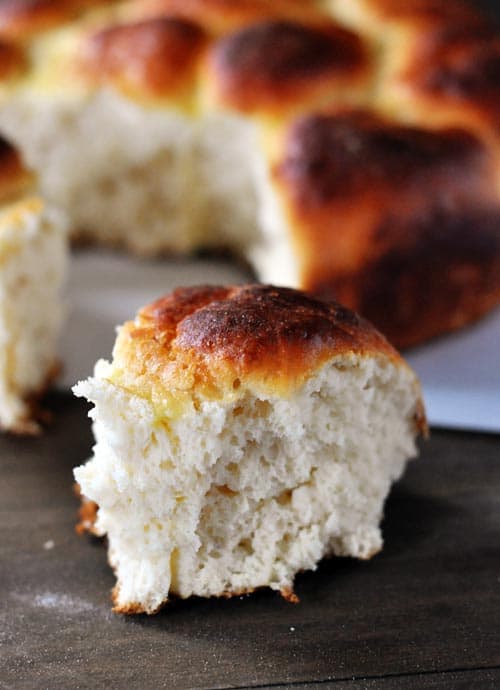
While I don’t eat gluten-free as a lifestyle, I’m all for giving new recipes a try and I’m loving on these Hawaiian sweet rolls.
I can’t believe how accessible making your own gluten-free bread can be! Nicole gives, like, one zillions tips and tricks and step-by-step pictures for everything from bagels to baguettes, tortillas to scones in this new cookbook.
It is revolutionary (like no other gluten-free bread cookbook in the universe, really). You don’t want to mess around with these recipes – Nicole has tested and tested and tested these babies to make them foolproof and following the ingredients and instructions to the letter will ensure fantastic results.
On a personal note, I can count other food bloggers I’ve actually become real, live friends with on one hand.
Nicole? She’s the real deal. She has been a breath of fresh air in the blogging world for me.
She tells it like it is (read: she doesn’t have one fakety fake bone in her body) and I love her blogging guts. I’m so proud of what she’s created here and so honored to help her get the word out about her book.
One Year Ago: Nutella Butterscotch Crumble Bars
Two Years Ago: New York-Style Crumb Cake
Three Years Ago: Sky-Is-The-Limit Pudding Pie
Gluten-free Hawaiian Sweet Rolls
Ingredients
Hawaiian Roll Dough:
- 3 cups 420 g Gluten-Free Bread Flour (recipe below), plus more for sprinkling
- 2 teaspoons 6 g instant yeast
- ¼ cup 50 g sugar
- 1 teaspoon 6 g kosher salt
- 4 tablespoons 56 g unsalted butter, at room temperature
- 1 large egg, at room temperature, beaten
- 1 cup plus 1 tablespoon pineapple juice
- 1 teaspoon gluten-free vanilla extract
- Egg wash, 1 large egg, at room temperature, beaten with 1 tablespoon water
Gluten-Free Bread Flour:
- 100 grams about 11 1/2 tablespoons all-purpose gluten-free flour (71%) (read note above)
- 25 grams about 5 tablespoons unflavored whey protein isolate (18%)
- 15 grams about 5 teaspoons Expandex modified tapioca starch (11%)
High-Quality All-Purpose Gluten-Free Flour:
- 42 grams about 1/4 cup superfine brown rice flour (30%)
- 42 grams about 1/4 cup superfine white rice flour (30%)
- 21 grams about 2 1/3 tablespoons tapioca starch (15%)
- 21 grams about 2 1/3 tablespoons potato starch (15%)
- 7 grams about 1 3/4 teaspoons potato flour (5%)
- 4 grams about 2 teaspoons xanthan gum (3%)
- 3 grams about 1 1/2 teaspoons pure powdered pectin (2%)
Make-It-Simpler All-Purpose Gluten-Free Flour:
- 90 grams about 9 tablespoons superfine white rice flour (64%)
- 31 grams about 3 1/2 tablespoons potato starch (22%)
- 15 grams about 5 teaspoons tapioca starch (11%)
- 4 grams about 2 teaspoons xanthan gum (3%)
Instructions
- Place the flour, yeast, and sugar in the bowl of your stand mixer, and use a handheld whisk to combine well. Add the salt, and whisk to combine. Add the butter, egg, pineapple juice, and vanilla, and mix on low speed with the dough hook until combined.
- Raise the mixer speed to medium and knead for about 5 minutes. The dough will be quite sticky, but should be smooth and stretchy. Spray a silicone spatula lightly with cooking oil spray, and scrape down the sides of the bowl.
- Transfer the dough to a lightly oiled bowl or proofing bucket large enough for the dough to rise to double its size, and cover with an oiled piece of plastic wrap (or the oiled top to your proofing bucket).
- Place the dough in the refrigerator for at least 12 hours and up to 5 days.
- On baking day, grease an 8-inch round baking pan and set it aside. Remove the dough from the refrigerator and turn it out onto a lightly floured surface.
- Knead until smoother as described below under general shaping tips. With a floured bench scraper, divide the dough into twelve pieces of equal size.
- Shape one piece into a round by following the directions for shaping small, round rolls below. Place the first roll in the prepared baking pan.
- Repeat with the remaining pieces of dough, placing the rolls less than an inch apart from one another. Cover the baking pan with oiled plastic wrap and set it aside in a warm, draft-free location to rise for 30 minutes. Uncover the pan and brush the rolls generously with the egg wash. Allow the rolls to finish rising, uncovered, until fully doubled in size (about 20 minutes more).
- About 20 minutes before the rolls have completed their final rise, preheat your oven to 350°F. Place the baking pan on the lower rack of the preheated oven and bake until lightly golden brown, and the inside of the rolls registers about 185°F on an instant-read thermometer (about 20 minutes).
- Allow to cool briefly in the pan before serving.
Notes
General Shaping Tips:
Unless otherwise noted, always begin on a well-floured surface with floured hands.
1. With the help of an oiled bench scraper, keep moving the dough as you shape it, particularly if it begins to stick to the surface or your hands. The process of kneading the dough in this book will be done using the scrape-and-fold method: Scrape the dough off the floured surface with the bench scraper, then fold the dough over itself. Sprinkle the dough lightly with flour, scrape the dough up again, and fold it over itself again. Repeat scraping and folding in this manner until the dough has become smoother.
2. Keep the outside of the dough and the surface covered in a light coating of flour as you shape the dough. Handle the dough with a light touch to avoid kneading the flour into the dough, which might dry it out and result in a tight, unpleasant crumb.
3. It bears repeating: A light touch is the key. Repeat that to yourself as a mantra as you first learn to shape this bread dough. It’s the most important rule in shaping. More technique, less muscle.
4. You’ll notice that the recipes do not include instructions to allow dough that has been rising in the refrigerator to come to room temperature before shaping. Always begin with cold dough when shaping the dough in this book. It is much easier to shape.
Shaping Small Rolls:
1. On a well-floured surface, flatten the dough into a disk, then pull the edges toward the center of the disk and secure the edges together by pressing them between your thumb and forefinger.
2. Turn the dough over so that the gathered edges are on the bottom and cup your whole hands around the dough, to coax it into a round shape.
3. Place the round of dough on a lightly floured surface and cup only one palm around the dough with the side of your hand resting on the counter (the
side of your hand nearest your pinkie). Maintaining contact between the side of your hand and the surface, begin to move your hand in a circular motion
while gently coaxing the edges of the dough upward (toward the top of the round) with the tips of your fingers.
4. Slash the dough with a sharp knife or lame held at a 45 degree angle to the dough.
Recipe Source: from the book Gluten-Free on a Shoestring Bakes Bread: Biscuits, Bagels, Buns and More by Nicole Hunn. Excerpted by arrangement with Da Capo Lifelong, a member of the Perseus Books Group. Copyright (c) 2013.
*Giveaway provided by Da Capo Lifelong Books, all opinions expressed are my own!
My first run on these was pretty dense and disappointing, but on my second attempt I proofed the yeast in pineapple juice and added it in the step calling for the juice – that seemed to improve the rise and then I was extra careful with the shaping this time. Still doesn’t hold a candle to King’s Hawaiian Sweet Rolls, but I can’t have them anymore.
I made your recipe but ended up with very dense buns with a great flavor(too dense to eat). I think I may have stumbled between steps 3 and 4. I understood to place the dough in a large proofing container, then place it directly into the refrigerator. Should the dough be proofed and risen before placing in the refrigerator?
I also wonder if I should have kneaded the dough before creating the roll shapes and proofing it a second time?
Help! Thanks!
This is where I think I messed up too. Is it supposed to fully rise (step #3) and then be placed in the refrigerator (step 4)?
can you post the nutrition.
This is my 2nd batch now, they come out great for me. I use a 16oz bag (3 1/4ish cups) of Bob’s red mill “gf homemade wonderful Bread mix” it includes the yeast so they rise like crazy. I use the extra 1/4 cup for dusting/fkouring the surface when shaping . It’s a bit pricey this way, but I do it for Gluten Free relatives.( and now for myself) They are easy to make and BOY ARE THEY YUM!!!
This is my 2nd batch now, they come out great for me. I use a 16oz bag (3 1/4ish cups) of Bob’s red mill “gf homemade wonderful Bread mix” it includes the yeast so they rise like crazy. It’s a bit pricey this way, but I do it for Gluten Free relatives.( and now for myself) They are easy to make and BOY ARE THEY YUM!!!
I have tried this 2times and it does not rise in the fridge. Do have this happen to you.
Can you use Bob’s Red Mill Gluten Free 1 to 1 baking flour for this recipe?
I haven’t, but I think you probably could.
would this recipe make good rolls for bbq pulled pork sandwiches? Or is there another roll recipe you’d prefer for bbq pulled pork sliders?
These are a little more biscuit-y in texture so I’d probably use these French bread rolls (although they aren’t gluten free like this recipe):
https://www.melskitchencafe.com/french-bread-rolls/
I have this dough in my fridge awaiting it’s next rise. I would have loved a couple pictures along the way of this dough since it is so different then a regular bread dough. I’m thinking my dough was too runny but I’m going to try again. Your blog has made me a wonderful cook and we haven’t bought bread in about two years. Thank you for all your hard work. Now please work even harder and add more pictures when things are not the norm 🙂
So far with gluten free baking/cooking, I’ve found that simply substituting the gluten ingredients (flour) with gluten-free ingredients (gluten-free all-purpose flour and xanthan gum) can either come out just as good as the original, or it could be a total flop. And the thing is, you never know until you try it! And sometimes, the gluten-free versions turn out even more delicious than the regular version! It’s all trial-and-error, but I’ve found it to be definitely more pleasantly surprising than disappointing – which gives me hope to keep on baking!
I,’ve had to start gluten free diet do to my stomach . This is all new to me. I,m having to learn everything I can, but it is hard to know which gluten free flour to use and weight and grams. Thanks to your web site hopefully I can learn. Thanks again
We have changed our diet in the last six months to 3/4 gluten free diet … I would like the new cookbook to make life easier to think of recipes that help to control our diet better. My husband is diabetic and this new change has helped a great deal to make easier for him ….. Thanks!
So far, I have always had good experiences. I look forward to making more recipes.
I’ve had very mixed results with GF – some from scratch, some from mixes or recipes. I make my own GF granola bars that are wonderful, and I love Chebe’s pizza dough, although I make it according to their old instructions, not the new. I’ve made delicious cornbread, cornbread orange cranberry muffins, and a cornbread-based lemon cake. I’ve also had some great banana bread – various recipes – again, varied results. Never gotten good bread, so I would love to try the new cookbook. I’ll have to look for it.
I have made some awesome things and some disastrous, all of the different flours can result in different consistencies so it can be little complex but doable.
We have been gluten free for 4 year now, and it’s been great! GF on a shoestring has made my baking skills accelerate so fast!!
I haven’t tried gluten free anything, yet! I was looking for resources and found this – thank you so much.
I have been a diagnosed Celiac for 10 years now. Good ingredients and recipes are much easier to come by now than they were back in the day!! I am always on the hunt for something new, fun and different (these rolls look amaz-balls) and get overly excited when something turns out. Better Batter gf flour was life changing for my baking life and I haven’t had a single misfire in months. Prior to that, lots of flat and failed breads…
I’ve been trying to healthy-up my entire family’s diet. Mainly focusing on Paleo, which is usually also gluten-free (if followed closely enough). I also have a friend with celiac disease, and I recently used the Chocolate Quinoa Cake recipe you posted a while back, Mel. By the second try (cooked the quinoa longer, and processed instead of blended it, for about 4 minutes), I had something that I would serve to my own family for dessert, not just my CD friend. I used the recipe to make her a fantastic 3 layer, 2 tier baby shower cake that (-excepting some gold-luster-dust painted fondant which could be easily avoided-) was entirely gluten free. Even non- GF people at the shower wanted a second slice! Other GF favorites in our house are spaghetti squash casserole and “Ugly Chicken Over Rice” (The GF Italian Chicken soup cooked in a crockpot, but I add spinach and black beans, and we almost always have it with jasmine or basmati rice.) This new cookbook sounds like it could be an amazing gift to give my CD friend, if not also our family.
I’ve had great results with Nicole’s recipes. I’m a huge fan of Better Batter and had never heard of it before reading her blog.
I made my first gluten free crepes last week, using coconut flour! They were delicious!!
As a former professional baker & dessert chef, it was really hard on me when I went gluten free. I LOVE LOVE LOVE baking – like when I worked as a baker I’d bake breakfast for myself at 2 am before going to work AND when I got home from baking all day, I’d usually bake a dessert or bread for dinner.
I just started learning to bake gluten free with some help from a gluten free friend & her mom who is an excellent baker. (Her mom is now my GFBF – gluten free baking friend – on facebook.) Hurray for baking parties!
I would love to get a copy of her book and be able to share it and bake – especially for the holidays. Then I’ll have something to share at our next GF Baking Party.
Also, I’m so glad that you are NOT GF & still loved the book – that says a lot.
🙂
We have a close friend who is allergic to gluten and I tried using gluten free breadcrumbs for a tonkatsu recipe. It didnt cook evenly ans was not as crunchy as the panko breadcrumbs. But Im glad I got to try it although Im not gonna use the gluten free breadcrumbs again.
My son just learned he has a gluten allergy. I want to be able to cook things for him that he can still enjoy.
I have a 9 year old son that has had to go Gluten Free this year. Since then, my Mom has had to start eating that way as well. It is not fun for me who loves to make muffins, cookies, and breads! I don’t make them as much, but when I do, I now have to make 2 recipes, one GF and the other regular. Would love to have some recipes that my whole family could enjoy! I have had pretty good success with recipes that have banana, pumpkin, applesauce, etc. Just gives it a little something extra that makes the gluten free flour taste okay.
I have been diagnosed celiac for 7 years and have yet to bake bread. I want to really bad. Maybe I’ll give it a try.
My daughter has encouraged my husband to eat GF since he has several stomach issues and it has made such a difference in the way he feels. Since we’re new at this I would love to be able to cook him bread since the ones I buy just fall apart when he tries to make a sandwich.
My youngest has a number of food allergies; one of the biggest is gluten/wheat. I would love to make these for Thanksgiving. Couple of questions though: what is Expandex modified tapioca starch? Is it different from regular tapioca starch? If so, where would I buy Expandex? Thanks so much for sharing this recipe! I’m hoping to get GFOAS’ new bread book for my birthday in a couple of weeks.
We’ve had some medical diagnoses in our house in the past year that require GF eating. I haven’t had a lot of luck with breads at all, aside from quick breads. I am so excited to try this recipe out, and I’m thinking that the flour combo I’ve been using is the problem. Thank you!
I just found out I’m gluten intolerant, which is sad since I make a whole wheat bread worthy of a farmer’s market table. I’m just starting my journey into gluten free and the first thing I baked was pumpkin cookies with a mix of almond, millet and amaranth flours. The amaranth is very strong and weird and I hope it grows on me. I also can’t have rice, potato or corn starch/meal due to blood sugar issues, so I can’t have most GF flours or goods.
I went gluten-free this year to try to address my myalgic encephalomyelitis and fibromyalgia. Bread is the number one thing I miss, so I am really looking forward to this book! I’ve been baking the breads in NIcole’s first book and working on perfecting my technique there, and enjoying it.